If you want to browse the web anonymously, access geo-restricted content, or protect your privacy online, you might want to use a proxy server on your Android device. You may have come across the term “proxy server” on the web but you may not understand what it means?
Don’t fret as in this article, we’ll talk about what a proxy server is, how you can set it up in Android through Wi-Fi and mobile data, how you can disable them and some basic difference between VPN and proxy itself since people often get confused between the two terms. We’ll also answer some of the most frequently asked questions at the end of the article.
How to Set Proxy in Chrome Android
Let’s get one thing out of the way – you can not set proxy in Chrome for Android directly. There is no option to do that. You can set proxy in Google Chrome if you are working on a Windows PC or Mac, but if you are using an Android device, and you are looking to set up a proxy for your Chrome app, there is no possible way to execute it.
The only way you can use it is that you set up a proxy within your Android OS device settings through Wi-Fi or cellular data which we have mentioned in detail below. This automatically sets the proxy for the Chrome Android app as well.
What is a Proxy Server
A proxy server is a server or a router that provides a gateway or it acts as a middleman between you and the internet. In the case of Android, it is a middleman between the Android device and the internet. It helps in safe browsing of the internet and changing, or strictly speaking, masking your IP address.
These proxies get the job done by hiding your IP address when you are browsing on the internet as your internet traffic gets routed through such proxies. It can also be called an intermediate stage since this server, when activated, is between the end-user and the web pages they visit.
So, how can you have a proxy setup? Before moving towards setting up your proxy in Android, you need to have relevant proxy details like a username and password. If you do not have them, follow the step below and If you have them already, skip this step.
How to Find Free Proxy IPs
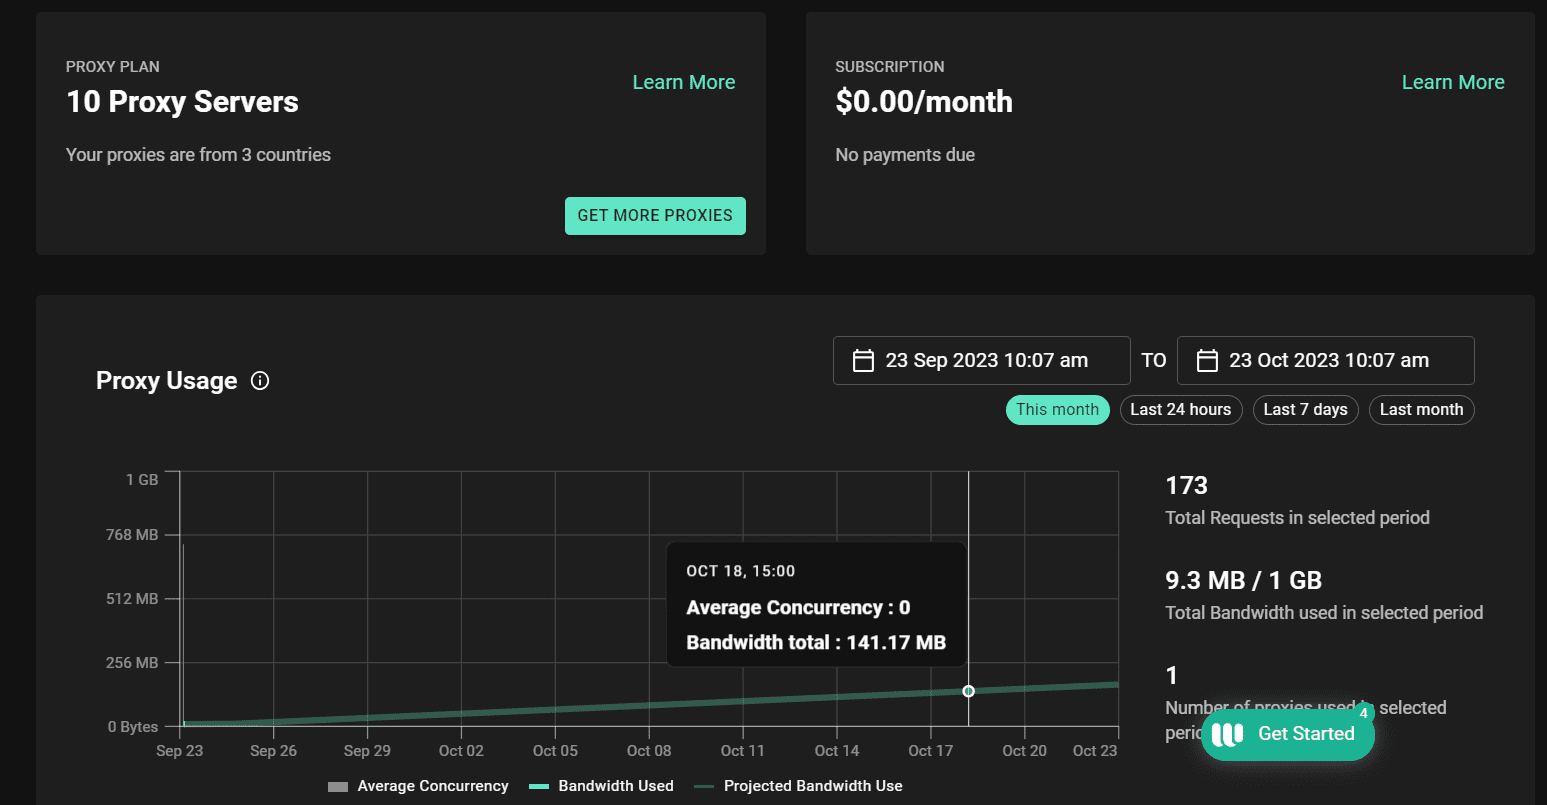
Proxies can be found either paid or free and there are many free proxy IPs available on the internet. Some of them that are available freely on the web are Webshare or Free-Proxy.cz that give access to the proxy addresses and port number of proxy servers available.
Webshare offers fast proxies ensuring you won’t have to deal with lag or slow browsing while hiding your IP address. You can get up to 1GB per month bandwidth while using their free version. You can also use Free-Proxy.cz that gives you a full list of proxy servers available from all over the planet. You can have access to the proxy list, web proxy list and the IP address info to know your IP address information.
How to Set Up Proxy Server in Android
Here, we will discuss how you can set up a proxy server in your Android device. We’ll discuss setting the proxy for the two types of networks, mobile data and Wi-Fi.
How to Set Proxy in Android for Wi-Fi
You can set up proxy for Wi-Fi in Android by following the steps below:
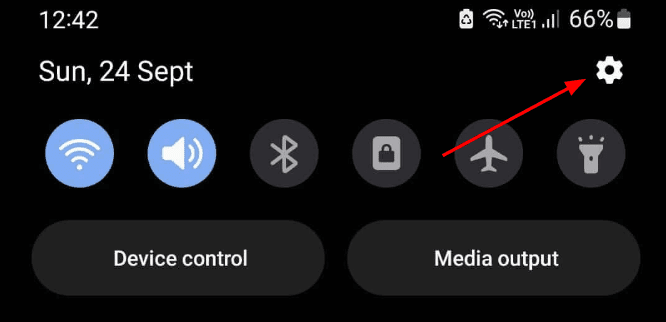
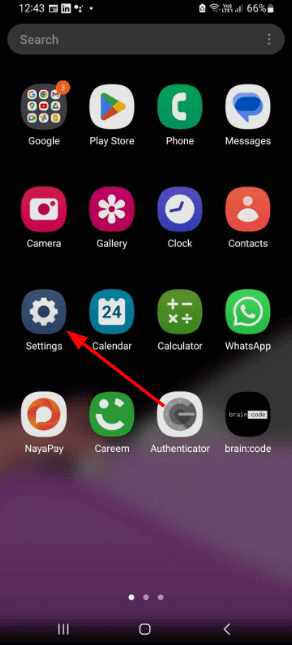
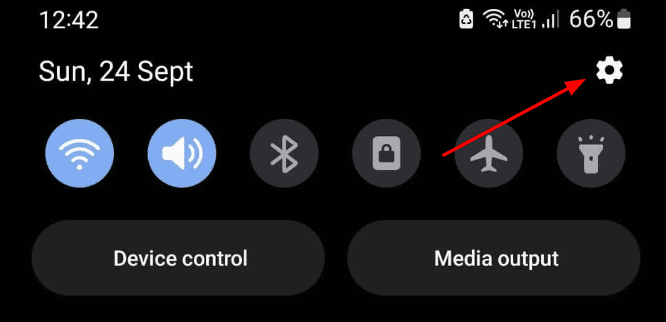
Step 1: Go to Settings through the Settings “gear” Icon or click on the gear icon on the top right corner when swiping down the notification bar.
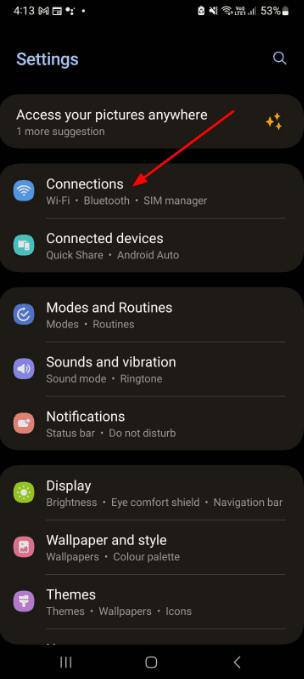
Step 2:From Settings, click on Connections that will take you to the network settings of your Android phone.
Step 3: From Connections, click on Wi-Fi, you may see your connected Wi-Fi as well. This will open up all the Wi-Fi networks, your Android device can reach and your connected network too.
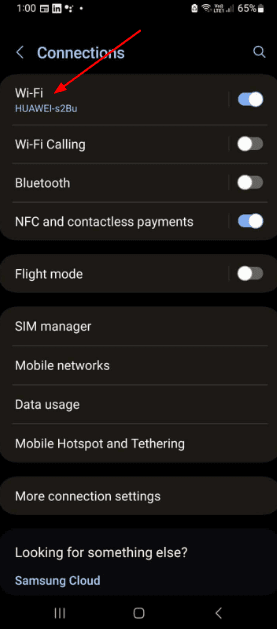
Step 4: From that, click on the gear icon right to your connected Wi-Fi.
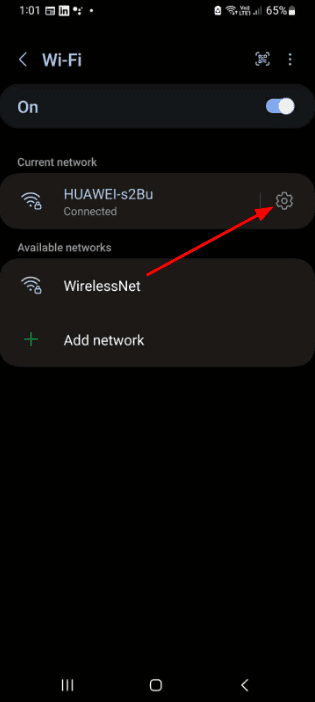
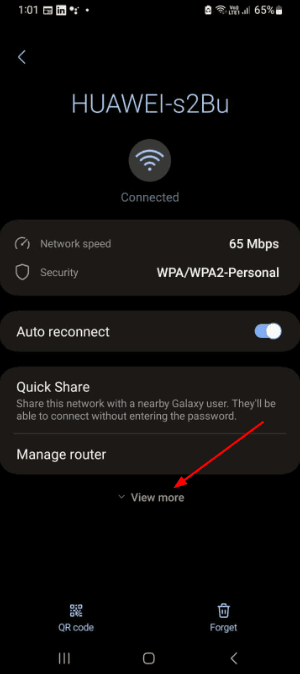
Step 5: This gear icon will take you to the settings of your connected Wi-Fi. From there, click on “View more” to see more options.
Step 6: After that, click on “Proxy” to show more options.
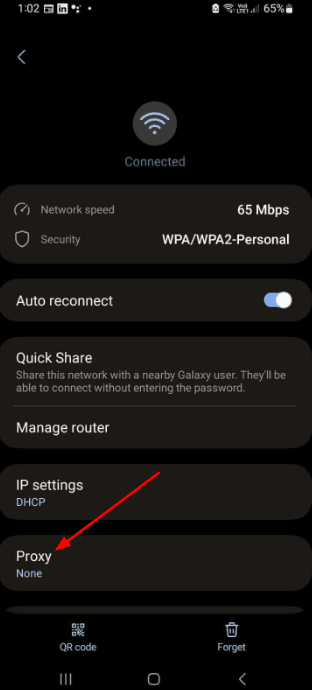
Step 7: The options shown are “None”, “Manual” and “Auto-config”. Click on “Manual”
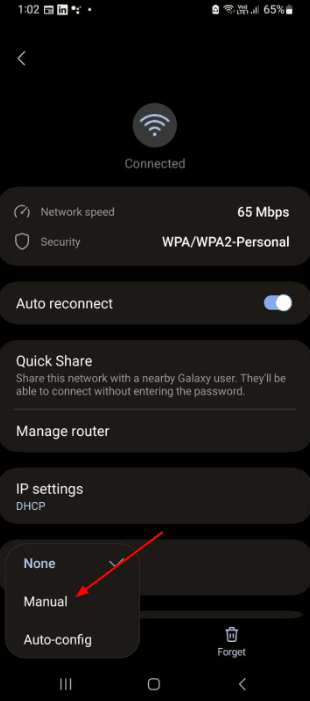
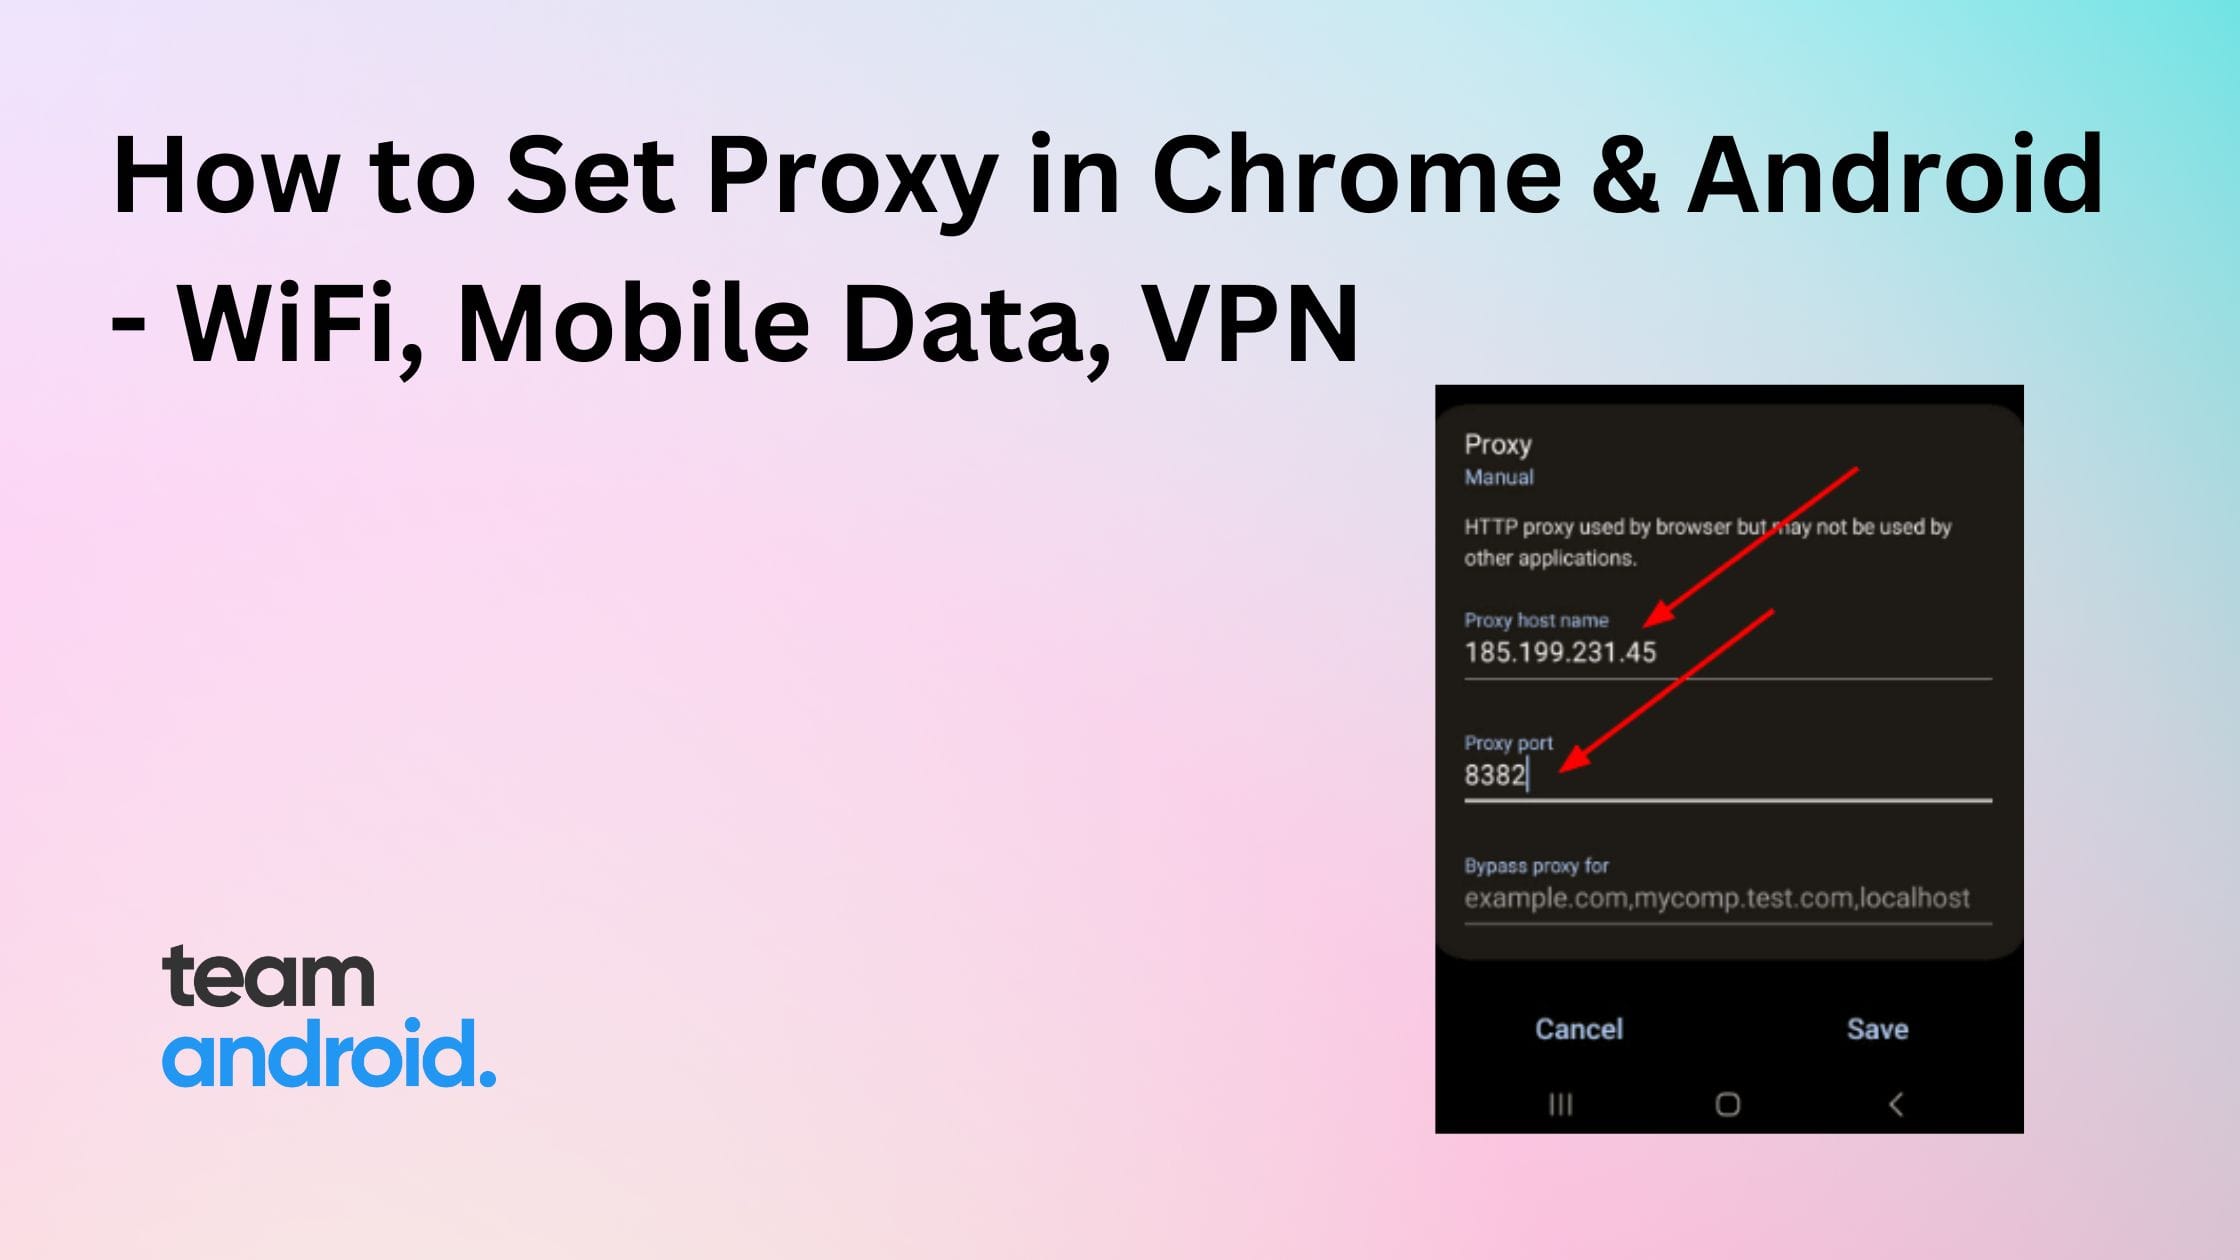
Step 8: Clicking on “Manual” will show more text fields that contains “Proxy host name” and “Proxy port” and “Bypass proxy”. You can add your proxy address in the “Proxy host name” and port number in “Proxy port” text fields. After adding the relevant fields, click Save.
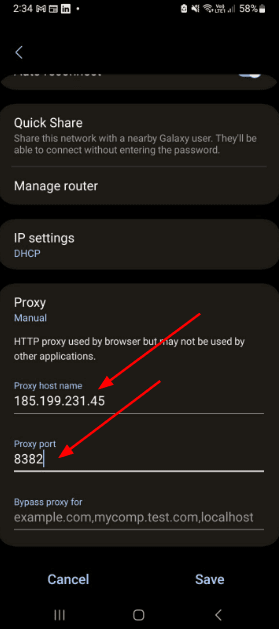
Step 9: After clicking on Save, toggle off and on your Wi-Fi connection and then your proxy server will be set up on your Android device through Wi-Fi. To verify that your Android device has connected to the proxy server, you can go to whatismyipaddress.com and see your updated IP address.
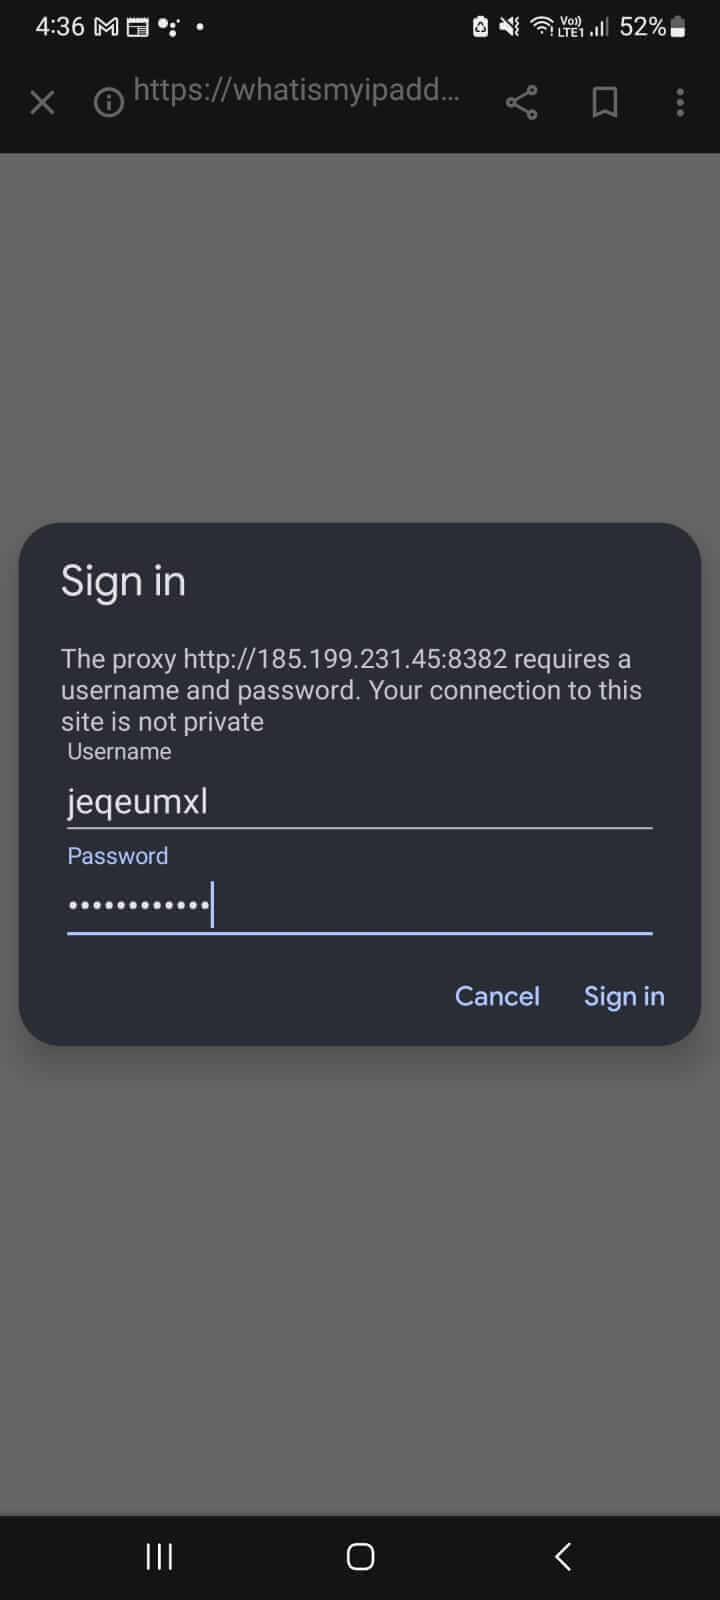
If you’re using webshare, you will have to enter username and password for the proxy server and those details are already provided in the table where you got the port address and port number in the first place. You will also see the “Connected without Internet” on your connected Wi-Fi in case of using webshare proxy servers. Ignore this as you are connected already with your proxy and there will be no hindrance with respect to surfing the internet.
How to Set Proxy in Android for Mobile Data
You can also set up proxy for your cellular data in Android by following the steps below:
Step 1: Go to Settings through the Settings “gear” icon or click on the gear icon on the top right corner when swiping down the notification bar.
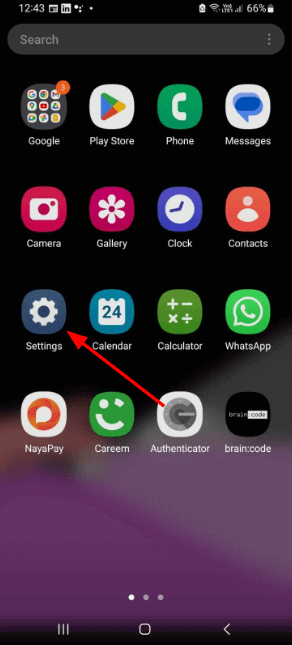
Step 2: From Settings, click on Connections that will take you to the network settings of your Android phone.

Step 3: From Connections, click on Mobile networks. This will open up mobile networks settings.
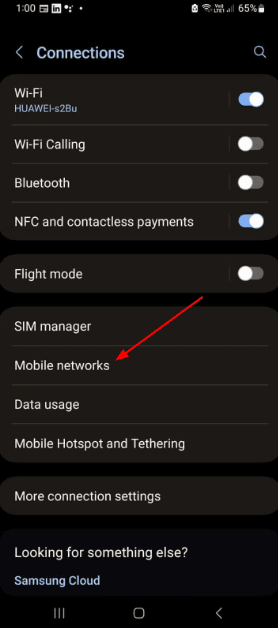
Step 4: From Mobile networks, click on Access Point Names (APN)
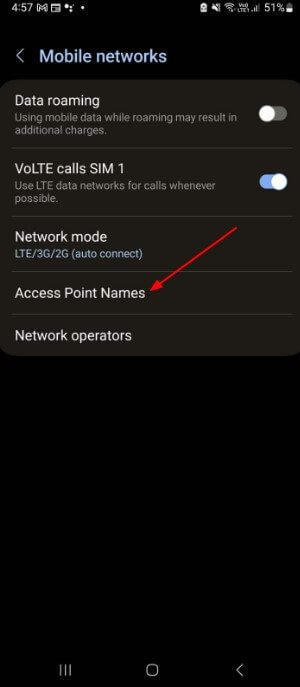
Step 5: From APN, click on the service provider that’s giving you access to the internet through mobile data.
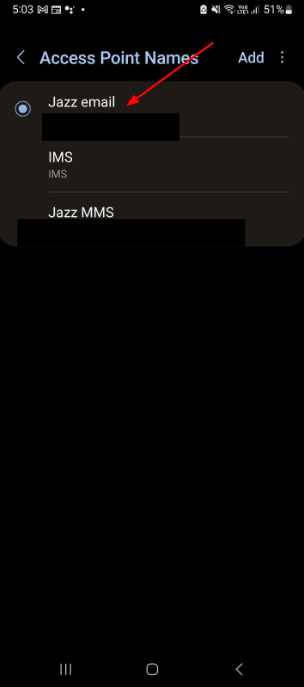
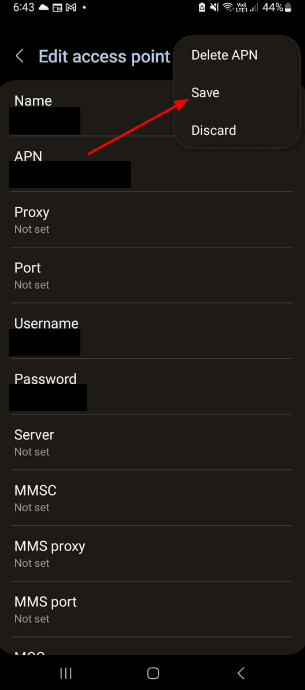
Step 6: From the access point, Click on “Proxy” which will enable a text field where you can add a proxy address. Clicking on “Port” will enable you to write the port number. If you’re using webshare, then you can add username and password through the “Username” and “Password” section.
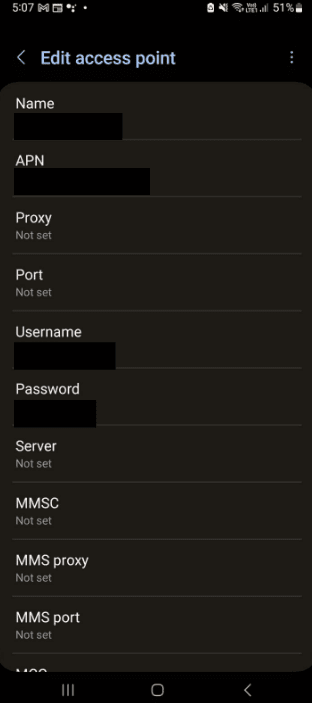
Step 7: After setting the required fields, click on the three vertical dots button on the top right corner and click on Save.
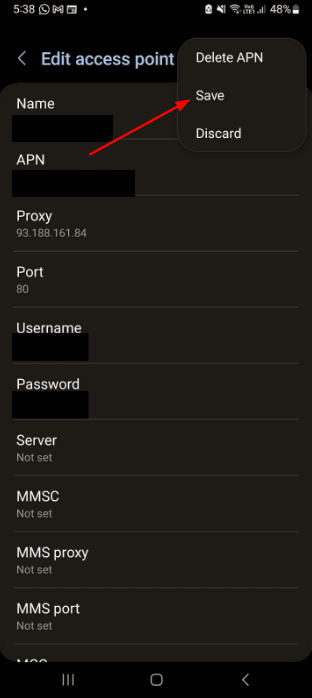
Step 8: After clicking on Save, toggle off and on your mobile data connection and then your proxy server will be set up on your Android device through mobile data. To verify that your Android device has connected to the proxy server, you can go to WhatIsMyIPAddress.com and see your updated IP address.
If you’re using webshare, you will have to enter username and password for the proxy server and those details are already provided in the table where you got the port address and port number in the first place.
How to Use VPN on Android
If you don’t want to get into the proxy setup, you can use VPN to browse the internet more securely along with protection from cyber attacks. VPN secures all the internet traffic and encrypts it for extra security and privacy.
There are two ways you can add a VPN connection in your Android device. You can either use your phone’s network settings to enable VPN or you can download a VPN app from the Google Play Store to get it going. We’ll discuss both of them in detail.
Using VPN on Android through Network Settings
If you have your own VPN network and just want to see how to add the relevant details on to your Android phone, you can follow the following steps:
Step 1: Go to Settings through the Settings “gear” icon or click on the gear icon on the top right corner when swiping down the notification bar.


Step 2: Click the “microscope” icon on top right of the screen and search for VPN and then click on the first result that pops in.
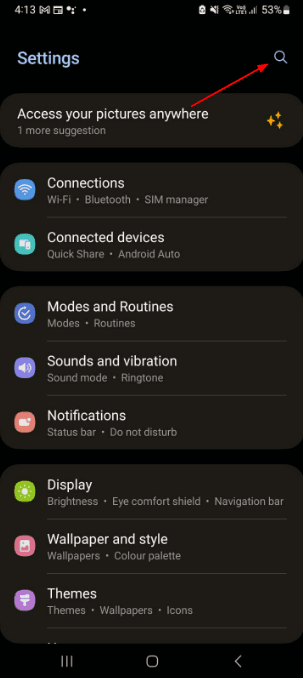
Step 3: After that, click on VPN. “None” means that there is no VPN profile right now.
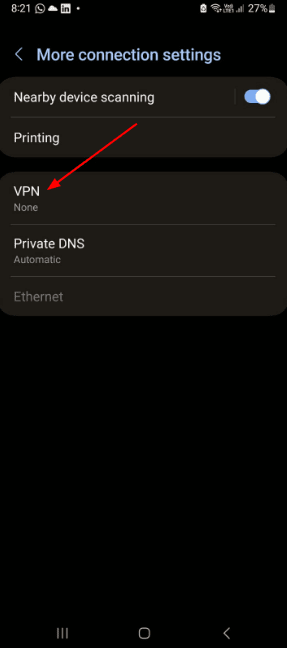
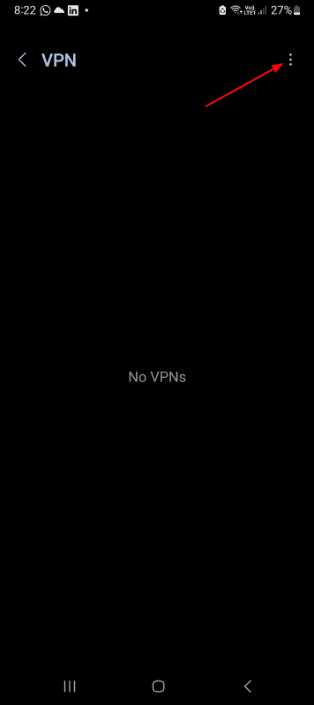
Step 4: Clicking on VPN takes you to the screen where you will have your VPN profiles. If you have never used a VPN before then this screen will pop up. Click on the three vertical dots icon on the top right and click on “Add VPN profile”.
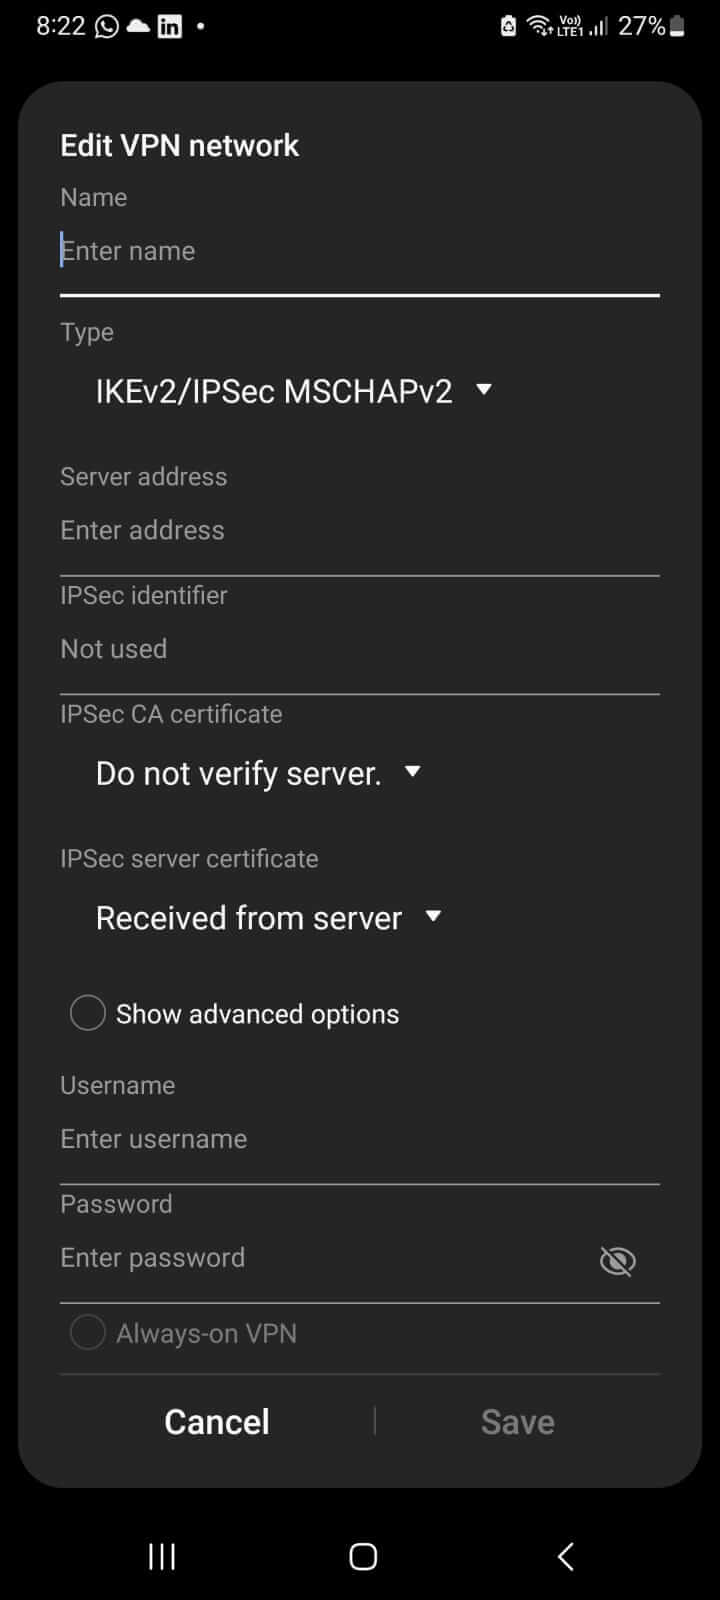
Step 5: After clicking on “Add VPN profile” this will take you to the screen where you will be able to add your VPN details like the name, server address along with username and password. Click Save to confirm your VPN connection
Using VPN on Android Through VPN App
If you don’t have your own VPN settings and are looking for an easy way to use VPN in your Android device. You can do so by installing a VPN application from Google Play Store. There are a lot of VPN applications available in Play Store that you can install. The applications include the paid versions and free versions as well.
One such VPN application that you can use is TunnelBear VPN. It’s free on the Play Store and its setup is very easy. Just install the app, sign up your account and give network traffic permissions. Voila! The VPN is integrated to your device and you can browse the web securely.
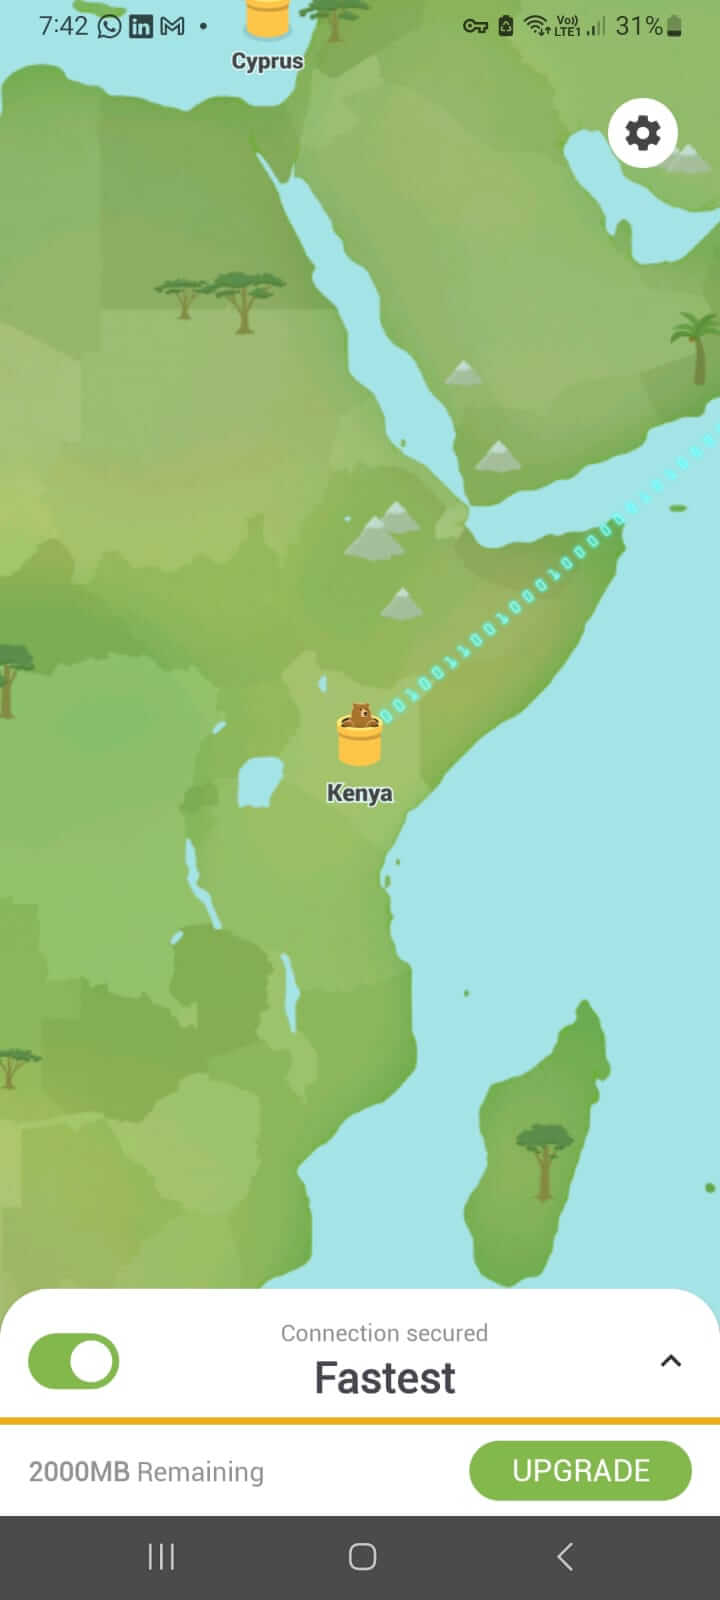
TunnelBear looks for the fastest VPN connection relative to your location but you can also choose the location of your choice. To access the locations of states of USA and cities of Canada, you have to upgrade to paid version of the application.
Proxy vs VPN: What is Better
People often confuse both proxy and VPN since both of these tools protect user identity and vital in accessing content through the internet securely. Due to these similarities, when people talk about browsing the web safely, they often use both proxy and VPN in the same manner.
However, there are minor differences between the two and through the table below, we’ll highlight some of the salient features like cost, privacy and speed etc of both of these tools.
| Features | Proxy | VPN |
|---|---|---|
| Encryption | No | Yes |
| Speed | Fast | Slow |
| Cost | Usually Free | Usually Paid |
| Reliability | Less Reliable | More Reliable |
| Privacy | Moderate | Enhanced |
How to Disable Proxy in Android
If you are done using a proxy or if some proxy is unresponsive, you can disable proxy for both Wi-Fi and mobile data by using the following methods.
How to Disable Proxy in Android through Wi-Fi
You can also disable the proxy in Android through Wi-Fi by following the exact first 5 steps that are mentioned above for setting up the proxy in Android for Wi-Fi.
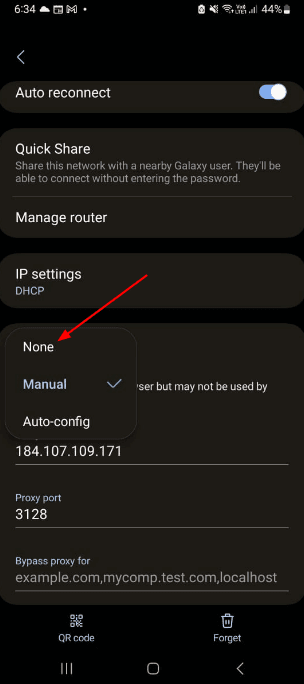
After that, click on “Proxy” to show more options. Click on “None” to disable the proxy that your Android device was connected with. Toggle off and on your connected network and your proxy will be disabled.
How to Disable Proxy in Android through Mobile Data
You can disable the proxy in Android through cellular data by following the exact first 5 steps that are mentioned above for setting up the proxy in Android for mobile data.
After that, set the “Proxy”, “Port”, “Username” and “Password” fields to “Not Set” and then click on the three vertical dots button on the top right and click Save. Toggle off and on your connected network and your proxy will be disabled.
FAQs
Here are some commonly asked questions about proxies, VPNs and proxy servers on Android and Chrome for Android. If there is anything else you want to know, let us know.
What Happens if the Proxy Server Doesn’t Work?
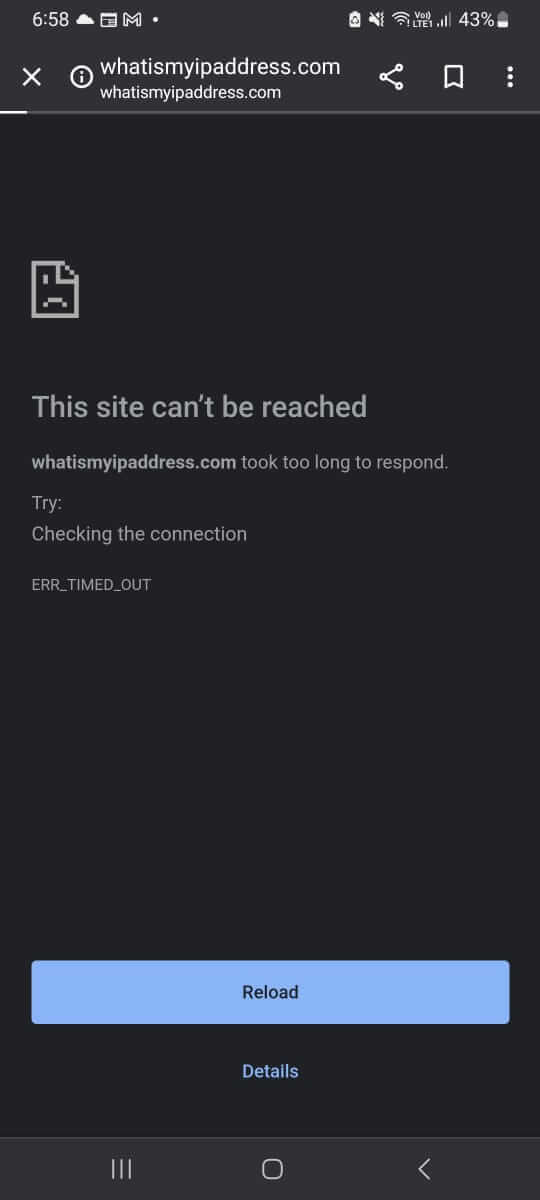
There are multiple possibilities of your proxy server not working. The proxy credentials may have been updated, the server itself may go offline or if you have a paid subscription of a proxy server then your subscription may have expired. In any way, this means that you won’t be able to access the internet through the proxy server and you may end up getting the error message like below.
Is it OK to Use Free Proxies on Android?
They may not be okay. One of the biggest disadvantages of using free proxies for Android is they may compromise your device’s security because they may collect the data that they need that impact your privacy. The proxy connection can be invaded by a cyber attack or the proxy provider may sell your data to third parties which exposes your privacy.
Is it Legal to Use Proxy on Android?
If your activity is legitimate like enhancing browsing speed then it is fine otherwise it is definitely illegal for criminal activities like hacking or breaking through websites that have a paywall. In such cases, the website owners may restrict or block the users utilizing proxy servers.
How to Solve ERR_TIMED_OUT Error?
The ERR_TIMED_OUT error occurs when your proxy connection has been timed out. This usually occurs when the browser waits way too long to get the username and password for the server but could not get it in time.
This error can be fixed by timely entering the username and password of the proxy server that is associated with. If you’re using Webshare then you would need the username and password.
How to Solve ERR_TUNNEL_CONNECTION_FAILED Error?
The ERR TUNNEL CONNECTION FAILED error occurs whenever you’re trying to connect through a proxy and the connection fails. This usually means that either the proxy server is down or you have not written the right username and password.
Turn the proxy off and then back on again, this should resolve the issue or if you’re using webshare then enter the right username and password for the proxy server.
Proxy servers are generally available freely and there are multiple websites that have the proxy addresses and port numbers but it is better to use Virtual Private Network (VPN) if you are looking for enhanced network security and privacy along with safe and private browsing.
There is not much of a difference between the browsing speeds of VPNs and proxy servers but if you are in a public place and are looking for a cheap way to browse the web privately then proxy servers are the way to go. What do you prefer? VPN or proxy servers? Comment below your choice and also suggest some cool VPN and proxy servers of your interest!
Enjoyed this article? Do check out some of the other guides I recently wrote for Android users:
- How to Access SMB Shares on Android
- How to Disable New Logcat in Android Studio Giraffe
- Is it Possible to Run Docker Containers and Kubernetes on Android?

