In this tutorial, we go through how to unroot Galaxy Note 10 and Galaxy Note 10 Plus with official Android 10 firmware. If you are looking to return to factory settings after modifying your phone with root, this is just the perfect guide. Soon after the phone’s initial launch, developers were quite quick to launch root support for Galaxy Note 10 series and since root offers so much functionality, it is a must try for every enthusiast Note 10 owner. However, after root, some stock functionality gets lost such as stock OTA (over-the-air) update and to restore that, you can use this guide to reinstall official factory firmware on Samsung Galaxy Note 10.
The procedure ahead enables users to download official Samsung firmware and flash it directly onto their Galaxy Note 10. After a successful flash, the phone will boot up back to stock settings (without root). This is also a great way to restore your phone if you plan on selling it. Once you unroot Galaxy Note 10, your device will be able to get OTA updates and your root modifications will be removed. We also have a similar guide if you want to unroot Galaxy S10 series.

Disclaimer: All the custom ROMs and firmwares, official software updates, tools, mods or anything mentioned in the tutorial belong to their respective owners/developers. We (TeamAndroid.com) or the developers are not to be held responsible if you damage or brick your device. We don’t have you on gun point to try out this tutorial 😉
You might find these following Galaxy Note 10 related articles interesting:
- USB Drivers: How to Connect Samsung Galaxy Note 10 to macOS / Windows PC
- Recovery Mode: How to Access Recovery Mode on the Samsung Galaxy Note 10
- Install Android 10: How to Install Android 10 on Computer
This firmware tutorial targets the Galaxy Note 10 and Galaxy Note 10 Plus universally. You just need to make sure you download the correct firmware for your model or variant and flash it with Odin to unroot Galaxy Note 10. You can download firmware from online sources or get it directly from Samsung servers using Frija downloader tool.
To make sure you own the correct Samsung Galaxy Note 10 model / variant, please see: Samsung Galaxy Note 10 Model Numbers / Country Variants Guide.
Samsung Galaxy Note 10 USB Drivers
You will need to connect your Android phone with the computer. For that, please make sure you have installed the USB drivers for Samsung Galaxy Note 10 properly. If not, you can download the latest official drivers from our Android USB Drivers section here:
Backup and Some Important Tips
After you have installed and configured USB drivers for Samsung Galaxy Note 10 on your computer, next, we recommend creating a system-wide backup of all your data just in case. While firmware installs usually do not delete data, a factory reset is sometimes initiated automatically which does it however.
Usually the most important things to look for to backup are:
- Camera Photos and Videos
- Music
- Account Information (Passwords and Usernames)
- WhatsApp messages – Check out our full guide on how to backup WhatsApp messages and media.
- Downloads
Conveniently, Samsung also provides a proprietary tool for creating a complete backup of your phone including settings, app data, photos and more. Named as Samsung Smart Switch you require a computer with ample space to store a complete backup of your phone.
A few more optional tips that you should remember:
- Having problems connecting your Android phone to the computer? You need to enable USB debugging mode. See here: How to Enable USB Debugging.
- Make sure your Android device is charged up to 80-85% battery level.
- Most of the tutorials and how-to guides on Team Android are for factory unlocked Android phones and tablets. We recommend NOT to try our guides if your phone is locked to a carrier, unless we have specified the carrier name or device model.
All set and ready? Good. You can now move ahead to the actual instructions on how to unroot the Samsung Galaxy Note 10 and Galaxy Note 10+ phones.
How to Unroot Galaxy Note 10 / Galaxy Note 10 Plus
Here is a detailed instructional guide on how you can unroot Galaxy Note 10 or Galaxy Note 10 Plus. We will be installing latest official firmware to unroot the new Samsung Galaxy Note 10 series. For those who have the 5G variant of this phone, this tutorial applies to that model as well.
Please read every line carefully and make sure you read the tutorial once before actually performing on your device.
To Remember:
- This tutorial is only for Samsung Galaxy Note 10 / Galaxy Note 10 Plus. Please don’t try this on any other variants of the phone.
- We will be using an official firmware by Samsung in our process to unroot Galaxy Note 10.
- Make sure you backup all your data in your phone before proceeding.
Complete Step-By-Step Instructions:
Step 1 – Download official firmware for your Galaxy Note 10 / Galaxy Note 10+ from below to your computer and extract the zip file.
- Android 10 Galaxy Note 10 Official Firmware (N970F)
- Android 10 Galaxy Note 10 Plus Official Firmware (N975F)
You can also use Frija tool to download firmware from Samsung servers directly.
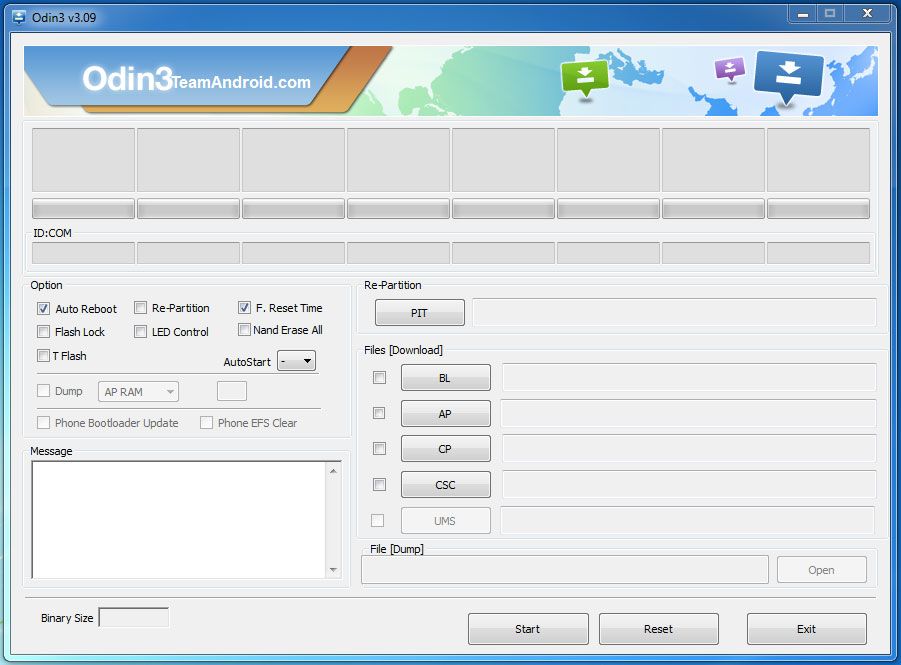
Step 2 – Download Odin which will help you to install official firmware on Samsung Galaxy Note 10 / Galaxy Note 10 Plus. NOTE: Android 10 is only supported by Odin v3.14.1, the latest release.
Step 3 – Switch OFF your phone. Now go to Download Mode. How? Press and hold the Volume Down + Bixby buttons together, and then press the Power button till you see the construction Android robot and a triangle. Press Power again to confirm to enter into Download Mode. Read: How to Enter Download Mode on Galaxy Note 10.
Step 4 – Make sure you have your Galaxy Note 10 USB drivers installed on your computer.
Step 5 – Open ODIN on your computer. Connect your phone to your computer while your phone is in the Download Mode.
Step 6 – If your phone is connected successfully, one of the ID:COM boxes will turn yellow with the COM port number. This step might take some time.
Step 7 – Now select the files that you have to flash/install on your phone. These files are to be found from the extracted files in Step 1.
- Click on ‘AP’ and select file with ‘AP’ in its name.
- Click on ‘CP’ and select file with ‘MODEM’ in its name. Ignore this step if there is no such file.
- Click on ‘CSC’ and select file with ‘CSC’ in its name. Ignore this step if there is no such file.
- Click on ‘PIT’ and select the .pit file. Ignore this step if there is no such file.
- Click on ‘BL’ and select file with ‘BL’ in it’s name. Ignore if there is no such file.
If you are using an older version of ODIN or flashing a firmware which doesn’t have the above mentioned file name format then look below for the abbreviations to the old name format. Do note that only file name changes, the functionality and back end process remains the same so don’t worry.
- AP = PDA
- BL = Boot Loader
- CP = Modem
Step 8 – In ODIN, check the Auto Reboot and F. Reset Time options. As for the Re-Partition option, check it ONLY if you selected a .PIT file in the above step.
Step 9 – Now click on the Start button in ODIN. Installation process will start and would take a few minutes to complete.
Step 10 – After the installation is completed, your phone will restart. After you see the home screen, unplug your phone from the computer.
That’s it. Your Samsung Galaxy Note 10 phone should have returned to factory settings and unrooted now.
If you run into any problems, feel free to drop us a comment below and we will reply you back ASAP with the fix or the solution to your problem.


if i do this can i gett offical uptades from samsung automaticly ?
hello
my Note 10 Plus still after flashing the firmware write that the phone is rooted and i cant use samsung pass